
How to set up two-step verification using authenticator app
While you can set up two-step verification using an email address or your phone number, Microsoft recommends (whenever possible) to configure the authenticator app if you have a smartphone. The benefit using the app is that makes things easier, and you'll get the security code even if the device isn't connected to a cellular network.

Use the following instructions to make your account more secure using the authenticator app:
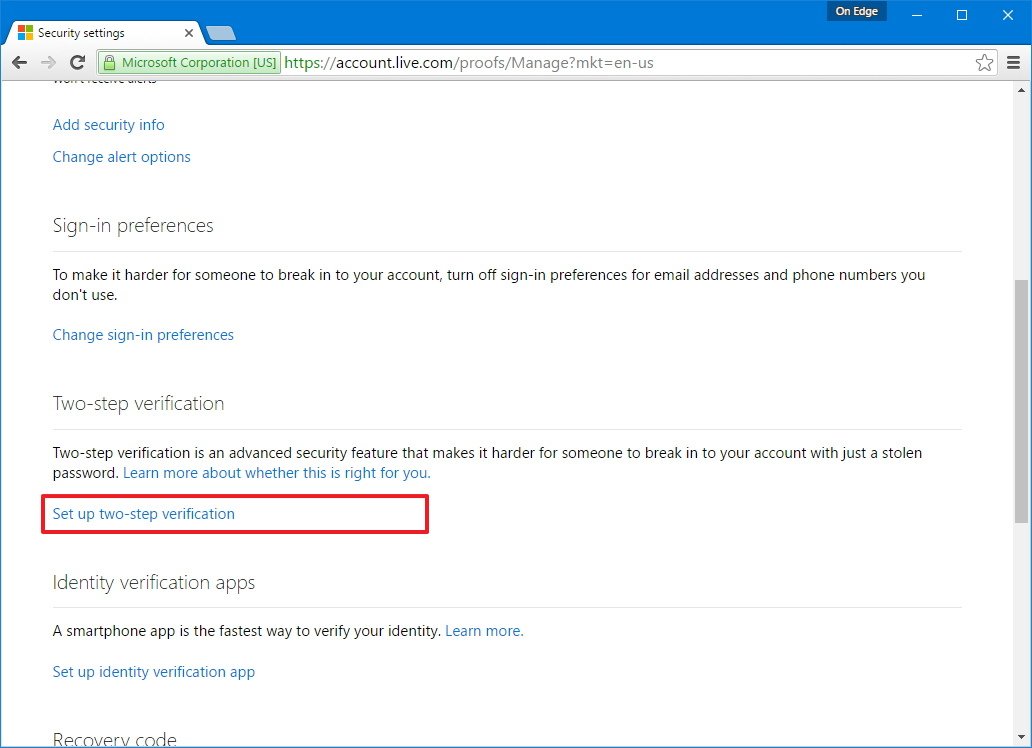
- Follow this link to access your Security settings on your Microsoft Account and sign in with your credentials. (Alternatively, you can also sign in to your Outlook.com account, click your name in the top-right corner, and click Account settings.)
- Click the Set up two-step verification link.
- Click Next.
- If you're trying to set up an account that is connected to a mobile device, it's likely that won't be offered the choice to select the verification method, but if you do, then choose An app from the drop-down menu.
- Select your device (e.g., Windows Phone, Android, or iPhone), and then click Next.

- Follow the next instructions depending on your device platform:
Windows Phone:
- Install the Authenticator app.
- Launch the app.
- Tap the "+" button to add a new account.
- Tap the camera button on the screen and scan the barcode to pair the device.

- Type the code generated on your phone on the last step, and click Next.

Android:
- Install the Microsoft Account app.
- Launch the app.
- Tap the set up now button.
- Enter the credentials for the account you want to associate, and click Next.
- Tap finish to complete.

iPhone:
- Install the Azure Authenticator app.
- Launch the app.
- Tap scan QR code to pair your device.

- Type the code generated on your phone on the last step and click Next.
- Print your recovery code in case you need to regain control of your account, and click Next.
- Click Next again.
- Click Finish.
How to set up two-step verification with a phone number
Another way you can set up two-step verification on your Outlook and Microsoft accounts is by using your phone number. However, remember that your phone needs to be connected to a cellular network to receive the text or call with the security code.
- Follow this link to access your Security settings on your Microsoft Account and sign in with your credentials. (Alternatively, you can also sign in to your Outlook.com account, click your name in the top-right corner, and click Account settings.)
- Click the Set up two-step verification link.
- Click Next.
- Select the A phone number option from the drop-down list and enter your phone information.
- Choose whether you like to get the security code via text or call and click Next.

- Enter the code you have received on phone and click Next.

- Click Next again.
- Click Finish to complete.
How to set up two-step verification with an email address
Alternatively, you can also use an alternative email address to protect your Microsoft online services. (Remember that you can't use an Outlook alias associated with the account you're trying to set up.)
- Follow this link to access your Security settings on your Microsoft Account and sign in with your credentials. (Alternatively, you can also sign in to your Outlook.com account, click your name in the top-right corner, and click Account settings.)
- Click the Set up two-step verification link.
- Click Next.
- Select An alternate email address option from the drop-down list and enter your new email address.
- Click Next.

- Sign in with your alternate email account, enter requested code on your Microsoft Account, and click Next.

- Click Next again.
- Click Finish to complete.
Generating new app passwords
After setting up two-step verification apps and devices, such as Xbox 360, Outlook desktop app for PC or Mac, Office 2010, Office for Mac 2011, or earlier, Windows Essentials apps, and others will stop working with your old password. The reason is that they don't support two-factor authentication, but you can fix this issue by creating an app password for each app and device that requires it.
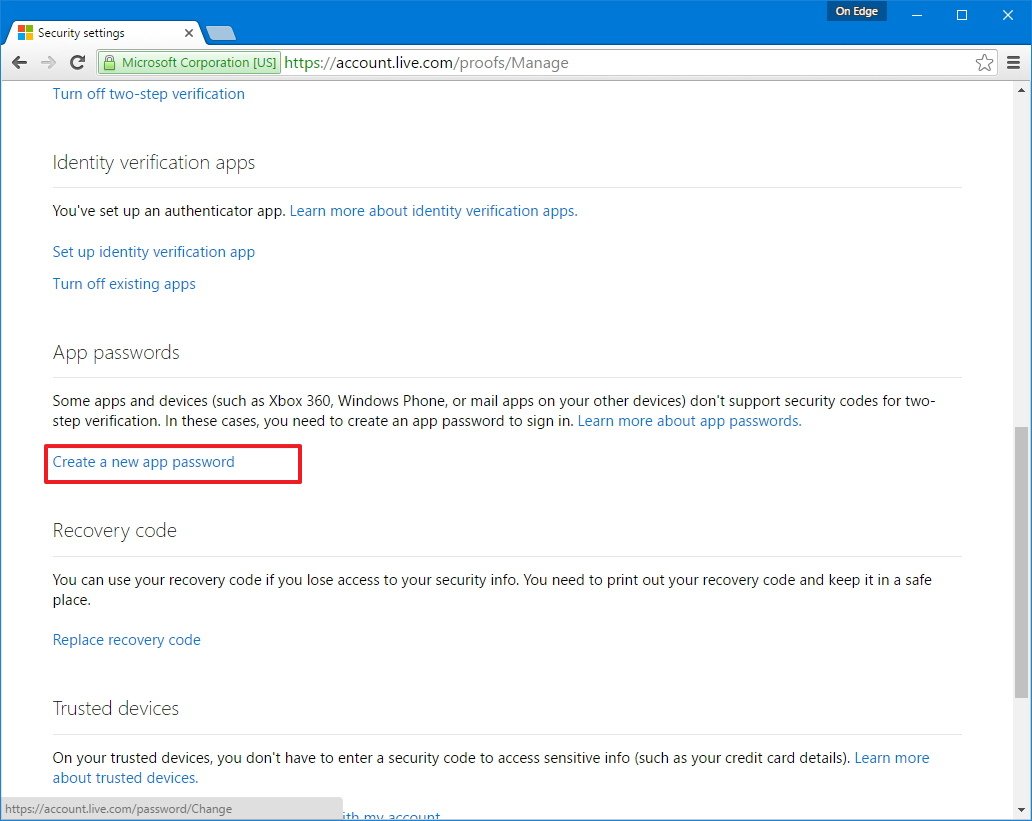
- Follow this link to access your Security settings on your Microsoft Account and sign in with your credentials.
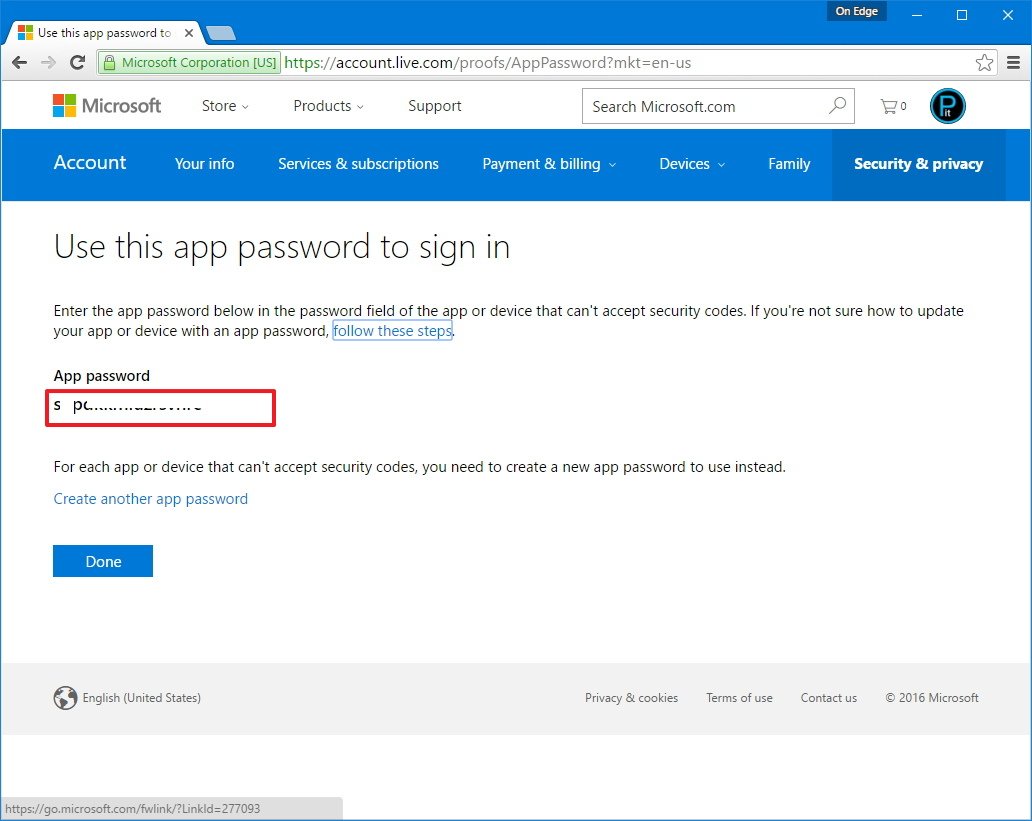
- Under App passwords, click the Create a new app password link.
- On the app or device make sure to update the password with the new one.
- Repeat the previous steps to create an app password for each device.
Keep in mind that if you happen to forget the app password there isn't a way to retrieve it, you'll need to create a new one. If you want to stop using app passwords, simply go back to the Security settings page, and click the Remove existing app passwords link.
Go back to one-step verification
While it's recommended to set up two-step verification on your account and keep it setup that way, it might come the time when you don't use this extra security layer, or you may want to change the authentication method. As such, to disable two-step verification do use the following steps:
- Follow this link to access your Security settings on your Microsoft Account and sign in with your credentials.
- Click the Turn off two-step verification link.
- Click Yes to confirm.
- Under Identity verification app, click the Turn off existing apps link.
- Click Remove to complete removing two-step verification on your account.

It's important not to forget that once you've disabled two-step verification, you need to update with your old password the apps and devices you updated with the app passwords to get them working again.


No comments:
Post a Comment