You must have heard about setting up 2-step verification for Google Apps mail to protect your Google Apps account better from hackers. As only you can get the verification code via your mobile phone, your accounts will be more secured with the 2-layer protection. However, after setting up the 2-step verification, many people using email clients such as Microsoft Outlook or Mozilla Thunderbird couldn’t receive emails from their accounts anymore. What’s the problem and is it necessary to set it up for these email clients?
Yes, using email clients to receive emails is essential for us. It does not only give you access to your email anytime even without network connection but also protect your important information better. If you read the news yesterday, maybe you know that a Google bug reset about 150,000 Gmail accounts and then all of their emails, attachments and Google Chat logs disappeared. If you set up an email client to work with Google Apps mail, you will still get your important emails and contacts in your computer and nothing will be affected. You can try the Google Apps Sync plug-in for Microsoft Outlook but it is only available for Google Apps for Business now. Therefore, in this post, I will present an alternate way to configure Microsoft Outlook for Google Apps with 2-step verification.

Step 1: Create application-specific password
If you have already used Outlook, you will not be able to receive emails after enabling the 2-step verification feature. That is because you added 1 more password layer and Outlook or other email clients can’t ask for verification codes now. So, to make it work properly, you will need to create an application-specific password and use it in place of your normal password.
- Go to Google App passwords in your Google account settings to generate your password.
- Keep the window open or save it somewhere because it will not be displayed again.
Step 2: Configure Google Apps Mail
- Go to your Google Apps mail account – Mail Settings – Forwarding and POP/IMAP and then choose the Enable POP for all mail option as shown below.
- Save the setting before leaving.
Step 3: Configure Microsoft Outlook
- In the Outlook program, go to Tools – Account Settings and click on New to create a new email account.
- In the next window that requires to choose Email service, select Microsoft Exchange, POP3, IMAP, or HTTP, and click Next.
- Select the checkbox “Manually Configure Server Settings or additional Server types” in the Auto Account Setup window.
- Choose Email Service: select the Internet E-mail and click Next.
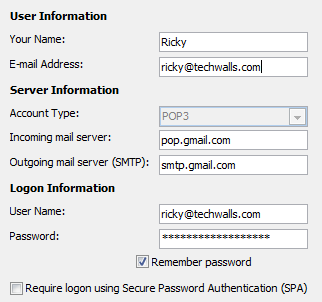
- In the Internet E-mail Settings, fill in information like below, remember to enter the password field with the verification code generated above.

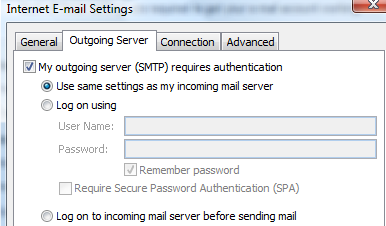
- Click on More Settings button, go to Outgoing Server tab and check the box My outgoing server (SMTP) requires authentication.

- Now go to Advanced tab and select the box This server requires an encrypted connection (SSL) under Incoming Server (POP3). Set the Incoming Server (POP3) port number as 995 and the Outgoing Server (SMTP) port number as 587. Use TLS as the Encrypted Connection.
- Click OK and Test Account Settings. It should work properly now.


No comments:
Post a Comment